Installing Hardie Plank siding on the shed/workshop

Siding is a wall's first line of defense against rain and the elements. For my shed/workshop, I chose James Hardie fiber cement siding.
Why fiber cement siding?
There are plenty of fun siding materials to sort through for a shed, from charred wood (yakisugi) and rustic cedar to vinyl, metal, and composites. I chose fiber cement siding for the shed because it's durable, long-lasting, affordable (about $2 per sq ft), and, most importantly, non-combustable.
The non-combustable part was important to me (and my city's zoning council) to meet safety codes and prevent potential fire spread. The low maintenance part is nice too.
The only major downside to fiber cement siding is working with it. It's heavy, brittle (hold it flat at the wrong spot and it will snap), and generates hazardous dust when cut. Thankfully 3M makes great respirators though, and there are ways to reduce the amount of dust too (more on that later!).
Planks vs Panels
Panels weigh 79 lbs a piece. Trying to move around a 4'x8', 79 lb panel solo, without snapping it, wasn't in the cards for me. While I liked the look of board and batten, Hardie Plank made the most sense. Plus, those Hardie battens are pricey!
Preparation
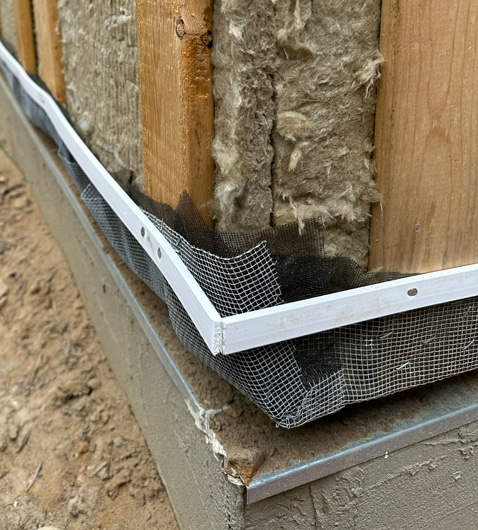
Before the siding could go up, I had to install a starter strip. I used PVC screen trim as a cheap, easy starter.
Useful Installation Tools
- Siding mounting tool: this thing was amazing. Once the first row of siding is up, this tool makes it a one-man job to hang the Hardie planks. It also ensures a consistent reveal between rows. If you're installing cement board siding, I highly recommend spending the $35 for it. There are plenty of other brands on Amazon which make a similar tool too, so you might be able to pick one up for even cheaper.
- WEN siding shear: another highly recommended tool. This massively cuts down on the amount of fiber cement dust generated when cutting the planks to size. You still should use a respirator, but this was way nicer than cutting the fiber cement boards with a circular saw. Note: it is tricky to get a clean cut with this thing. If you want smooth edges, a circular saw might still be the move.
- PIERCE 15° professional coil siding nailer: a nailer punches through the fiber cement boards easily without snapping them. It also makes installation go way faster. I sold mine after I was done with it for a nice chunk of change too, making this an easy decision vs renting a nailer.
- Air compressor: If you use a nail gun, you'll need an air compressor. Direct Tools Factory Outlet sells reconditioned tools at fair prices. I used this Rigid 6 gallon portable air compressor for framing, siding, and more.
- 15 Degree 1-3/4" rink-shank, hot-dipped galvanized siding nails: these nails worked great for holding up the siding, and the hot-dipped galvanization should ensure they last a long time.
- 8' step ladder: I needed a way to hang the higher planks, and careful handling along with a step ladder made that possible. I picked mine up on sale at Lowe's, but lots of brands make a good, usable ladder.
Delivery and hanging the first row
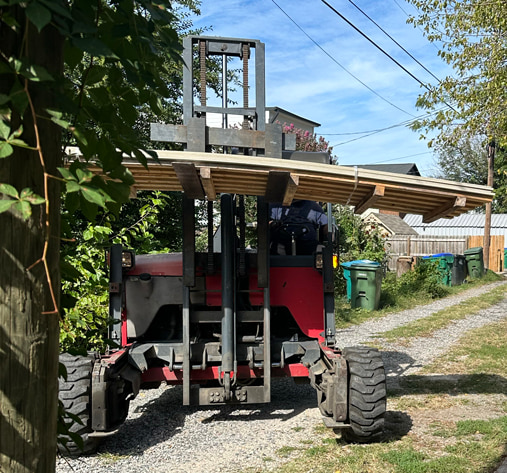
My car can't fit the 12' long Hardie planks, so I ordered them for delivery. Once they arrived, I cut the first row of planks to size with the siding shear. Placing two 2x4s under the plank gave me enough clearance for the shears to do their work. The cuts weren't razor-sharp, but for my shed/workshop, they worked great.
With a little help from my folks and my partner, I was able to get the first row hung up over the starter strip. The siding nailer sent a few nails clean through the siding, but I soon dialed in my nailer psi and (mostly) got the hang of it.
Hanging the rest
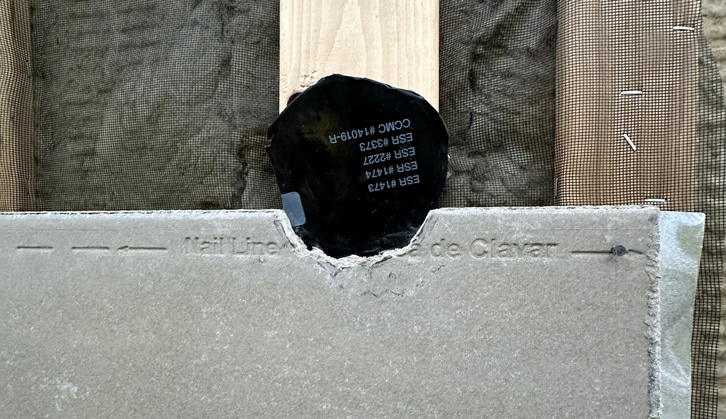
With the first row installed, I could start using the siding mounting tool set. I configured it to the reveal I wanted (7"), locked both tools in place, and placed the siding into them. They held the siding while I went from furring strip to furring strip, nailing the siding in place.
Note: I opted to do blind nailing - where the nails are hidden by the next row of siding above them. It's a cleaner install and more reliable at keeping out water.
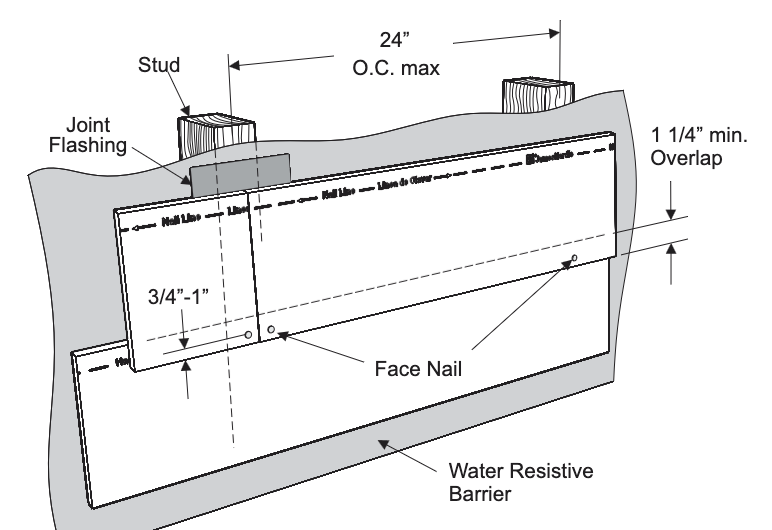
Image credit: James Hardie
Any butt joints in the siding had a galvinized steel strip of sheet metal placed behind them for extra water protection. Technically, this metal flashing is only required for face nailing (as shown in the diagram above), but I figured the extra insurance couldn't hurt.
Tricky details
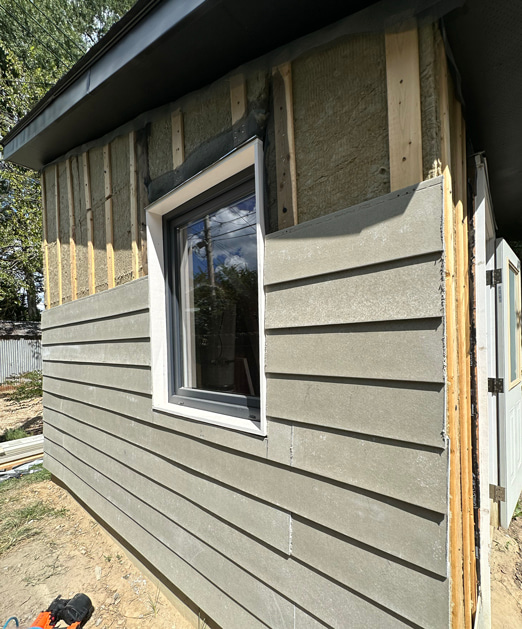
The hardest cuts to get right were the diagonal cuts for the rake walls. Lining up the cuts while ensuring there was enough space for the upper board to cover the top of the board below it was tricky, and I ended up with a fair share of miscuts, but in the end it turned out quite nice. Plus, any waviness in the diagonal line will eventually be covered up by trim anyway.
Cutting around the windows was difficult as well, and I ended up with some snapped boards. Very careful placement of the planks was key when installing the boards with narrow 2-3" slices going across the top of the window opening.
The minisplit line location was another place where I had to slow down. I pre-installed a minisplit wall sleeve using a 2-7/8" hole saw bit, slanted slightly downward. It got covered with Zip flashing tape until the actual installation could take place. By measuring the hole locations and depths, I was able to pre-cut the fiber cement siding board so it fit snugly around the minisplit sleeve.
Finishing up
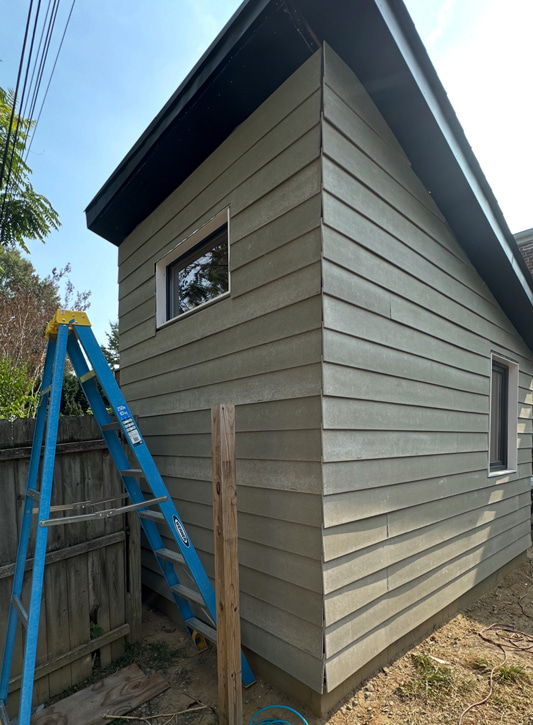
On it went, cutting a couple planks to size, lining them up for placement, charging the air compressor, nailing them in, hand-hammering any proud nails, then aligning the next row and doing it all over again. It was slow-going, but over the course of a few weeks I got it all installed.
Up next
Next I paint the siding and install the trim!